
I finally ignored the lawn mower, dishwasher, vacuum, and other things to just spend a few days sewing!!! I had one project I really, really, wanted to finish before July 4th for the grand kiddos plus I have a gazillion projects STACKED.
I started on finishing one of the orphaned projects when one of my learning to sew kids moved to Missouri. I got the leopard print tunic done and gifted to a local kid, who was delighted with it.
Boom, done, outta here. I forgot to a pic of it.....oops.
Then I started on this idea I saw on pinterest (gotta love pinterest, eh? tons of ideas, which I will NEVER EVER find time to do!!) It was this cute little dress....

I had to figure out the pattern and there is a lot I would change from what I did on a second attempt.
I made it into a cotton skirt, eliminating the top. Since cotton wrinkles, I interfaced all the ruffles hoping it would eliminate the need to iron them. I also tacked them down every so often to the base fabric under them so they won't get pressed UP when the kid sits down. I interfaced the bow also hoping again for it to retain its shape during laundering. For granddaughter #1 skirt, I used a really stiff double sided iron on interfacing and I know that bow won't budge!
And here's what I came up with for #1 granddaughter (who is 9) and #2 granddaughter (who is 2 1/2)
Fronts:

The fronts of the skirts.

The backs with the bows and ruffles. BOOM. DONE. Outa here.
To determine how wide to cut the blue fabric I doubled the size of the girl's waist. Then cut off a wedge at the bottom for the V at the back. Length of the skirt was from the child's waist to knee measurement. I gathered the blue fabric to the child's hip measurement plus about 4 inches, made a white casing, and inserted 1" wide no roll elastic with a width 3" shorter than the waist measurement.
2 1/2" Ruffles were interfaced, hemmed, and the top serged, then gathered. Starting at the bottom on a white V, ruffles were zigzagged at the top and layered upward with a 1" space at the edge of the V to attach to the blue. I tacked the ruffles down every 4" or so to avoid having them pressed UP when the child sits down. Bows were made and attached center back.
WHAT I WOULD CHANGE if I ever make it again: I would put a underskirt with a white ruffle peeking below the hemline and eliminate the white V for the ruffle. I would extend the ruffles to go about 3 or 4" on either side of the blue and not attach it all but let 'flow' over the ruffles.

And of course, grandson (he is 6 1/2) wouldn't wear a skirt. He got this shirt in matching fabric. Rules for sewing for him? No 'cute' factors and absolutely no Pink!! I pointed out to him his sister's skirt matched and he could wear both as an ensemble. His response? "NO WAY!"

I used this Simplicity pattern #4760 for the shirt, View B (yellow).
It was well sized, and fit the measurements listed on the pattern back. Grandson tried it on for me and it fit him perfectly! BOOM DONE. Outa here!
WHAT I WOULD CHANGE if I make this again: Nothing about the pattern. It was perfect.
BUT I would NOT use my Bernina buttonhole stitches again. I HATE the bernina buttonhole system. It feeds the fabric at a different rate on the right side (reverse side) and looks wonky. It took LOTS of tests to get the reverse side the right length even saving the buttonhole with the auto feature. I had to find the 'right' tension to hold the reverse side fabric to get to feed to approximately the right length and then manually restitch EVERY blooming buttonhole so there were enough stitches to prevent raveling. The buttonholes look 'homemade.' PHOOEY on that. My machine is due for a cleaning so I'm going to mention these problems to the technician. Surely you wouldn't put that wonky system on a multi $$$$ sewing machine? It also quit doing the monograming well and it's wonky also.
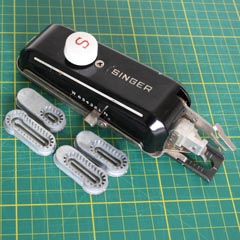
I remember my mom's 1950's Singer that I learned to sew on. It had a buttonhole attachment with a cam system that produced the most professional looking beautiful buttonholes each and every time. I checked Ebay and they have them. I'm getting one. I already bought the attachment shank for the Bernina so it would work on it. Good Grief. If a 1950's was so much better, the people making computerized sewing machines couldn't have done something similar??????
My knitting projects continue on. I usually have something on the needles - mostly socks. I have discovered smart wool sock yarn and having been using it exclusively. I read that if you insert a sewing thread into your knitting over the heel and toe it reinforces those areas. Well that was much Easier Said than Done. I tried on my current socks and found it was not so easy especially with two socks on a circular needle which resulted in four threads (2 wool, 2 threads) going to my needles at the same time. Yikes. Will see if it is now truly 'reinforced'.

Smart wool socks I knitted from a Mary Maxim sock surprise box. I was well pleased with what I received for the price and will order again. I got enough for 3 pairs.
UPCOMING PROJECTS:
1) Do two more orphaned top projects from when the sewing kid moved.
2) Re-upholster the seat on a road cart and put on the new tires and DRIVE my mare. OFTEN...
3) Fiberglass the water tank...it's getting thin and I would sure hate to lose it. We use it for our swamp cooler and my 'tank garden'.
4) Make some denim shirts for Hubby. At least 3....
5) Do the sofa pillows project that has been sitting in the sewing room for a L>O>N>G Time!!!
That should keep me busy for a while....
Next time I will try to remember to post the story of a True UFO (the flying kind) that happened to us when we were newly married in the 1970's.
Till then --- CRAFT ON!
You are a very talented seamstress. My mother made most of my clothes until I graduated from high school. She had to have everything fitted perfectly, and matched all stripes, etc. She told me that on the first day of school (the First Grade) I came home at noon and said school was great, but I wasn't going back in the afternoon. This was in 1945, and mother was still a "new" mother because I had lived the WWII years with my grandmother, while my parents worked 12 hour shifts, six days a week in the Ship Yards. Mother said she racked her brain and decided to offer a change to a new set of clothes she had made as a bribe. It worked and I evidently never refused to go to school again. Clever little "new" mom.
ReplyDelete